ActiveReportsのFlashビューワを表示するASP.NET MVCのHTMLヘルパーを作成する
6月11日(土)に下記のイベントが開催され、私も参加予定です。
@IT .NET開発者中心 × Microsoft Tech Fielders 共催セミナー mvcConf @:Japan ~ ASP.NET MVC ブートキャンプ ~
既に満席となってしまっていますが、Ustream配信も予定されているそうですので残念ながら申し込みが間に合わなかった方はオンラインでご参加いただければと思います。
USTREAM: mvcConf @:Japan ? ASP.NET MVC ブートキャンプ ?: @IT .NET開発者中心 × Microsoft Tech Fielders 共催セミナー
私自身ASP.NET MVCはいくつか記事を読んだ程度でほとんど触れたことがありません。そこで、イベントに向けて少しは知識をつけたいと思い、タイトルの通りActiveReportsのHTMLヘルパーを作成する方法をこのblogで紹介します。なお、ASP.NET MVC歴2日目ですので、間違っている部分があればコメントで指摘していただけると幸いです。
今回紹介する方法は、下記のblogを参考にしています。
I Code Therefore I Am: The fresh glance at using ActiveReports 6 in ASP.NET MVC.
今回紹介する内容を作成した環境は以下の通りです。
- Visual Studio 2010 SP1
- ASP.NET MVC 3 RTM
- ASP.NET MVC 3 RTM Tools Update
- ActiveReports for .NET 6.0J SP2
作成手順を説明する前に、プロジェクトの簡単な構成を紹介します。
ActiveReports(for .NET 6.0J Professional)では、WebアプリケーションのビューワとしてFlashビューワが用意されています。Flashビューワは通常ASP.NET Webフォーム向けのコントロールである「WebViewer」の1形式として使用しますが、技術的にはFlashビューワ単体で使うことも可能です(公式にはサポートされていません)。今回はこのFlashビューワをHTMLヘルパーで出力するという方法を取ります。
Flashビューワにレポートを表示するには、ActiveReportsネイティブの出力形式であるRDFファイルが必要です。ActiveReportsには、拡張子.rpxと.activereportの要求でレポートを返すASP.NET HTTPハンドラが用意されています。ドキュメントではRawHTMLとPDFの出力形式がサポートされていると記載されていますが、実際にはRDF形式を出力することもできます(公式にはサポートされていません)。このHTTPハンドラを使って、Flashビューワにレポートを表示する方法を取ります。
[新しいプロジェクト]で「ASP.NET MVC 3 アプリケーション」のプロジェクトを作成します。ここではプロジェクト名を「ActiveReportsMvcApp」とします。その後に表示されるダイアログでテンプレートは「インターネットアプリケーション」、ビューエンジンは「Razor」を選択します。
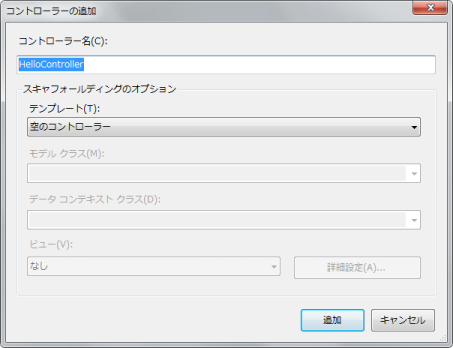
まずは、ソリューションエクスプローラからControllersフォルダを右クリックし、[追加]-[コントローラー]を選択してコントローラークラスを作成します。その後に表示されるダイアログでコントロール名「HelloController」とし、テンプレートはデフォルトの「空のテンプレート」のままとします。

Modelsフォルダに、レポート名とパラメータを格納できるReportViewModelというモデルクラスを作成します。
namespace ActiveReportsMvcApplication.Models
{
public class ReportViewModel
{
public ReportViewModel()
{
ReportParameters = new Dictionary<string, object>();
}
public string ReportName { get; set; }
public Dictionary<string, object> ReportParameters { get; private set; }
}
}
プロジェクトにReportsフォルダを作成し、レポートファイルを追加します。今回は.rpx形式のHTTPハンドラを使用するため、「ActiveReports 6.0J ファイル(XMLベース)」を選択します。

レポートファイル名は「TestReport.rpx」とし、適当にレポートをデザインします。
ReportsフォルダにはFlashビューワから要求が来るので、以下の1行を「Global.asax.cs」ファイルのRegisterRoutesメソッドに追記し、ルート定義を無効にしておきます。
コントローラークラスのIndexメソッドを以下のように書き換えます。
{
var model = new ReportViewModel { ReportName = "/Reports/TestReport" };
return View(model);
}
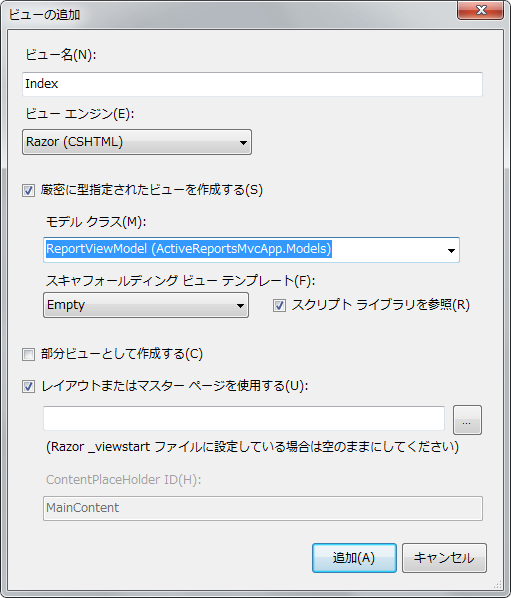
コントローラークラスのIndexメソッド部分を右クリックして、[ビューの追加]からビュースクリプトを追加します。その後に表示されるダイアログでは、ビュー名は「Index」、ビューエンジンを「Razor (CSHTML)」とデフォルトのままにし、[厳密に型指定されたビューを作成する]にチェックを入れてモデルクラスに「ReportViewModel (ActiveReportsMvcApp.Models)」を選択します。

プロジェクトにHelpersフォルダを作成し、「FlashViewerExtensions.cs」クラスを追加します。以下のようにコードを記述します。
2011/06/13 修正
Html.RawでHTMLエンコードを回避していた部分を、ヘルパー側で行うように修正しました。
using System.Web;
using System.Web.Mvc;
using System.Web.Routing;
using ActiveReportsMvcApp.Models;
namespace ActiveReportsMvcApp.Helpers
{
public static class FlashViewerExtensions
{
public static IHtmlString FlashViewerFor(this HtmlHelper htmlHelper, string name, ReportViewModel model)
{
return FlashViewerFor(htmlHelper, name, model, null);
}
public static IHtmlString FlashViewerFor(this HtmlHelper htmlHelper, string name, ReportViewModel model, object htmlAttributes)
{
var tagBuilder = new TagBuilder("object");
tagBuilder.MergeAttribute("type", "application/x-shockwave-flash");
tagBuilder.MergeAttribute("id", name);
tagBuilder.MergeAttribute("data", "/ActiveReports.FlashViewer.swf");
if (htmlAttributes != null)
{
var actualAttributes = new RouteValueDictionary(htmlAttributes);
foreach (var key in actualAttributes.Keys)
{
tagBuilder.MergeAttribute(key, htmlHelper.Encode(actualAttributes[key]));
}
}
var innerContent = new StringBuilder();
innerContent.AppendLine(MovieParameter);
innerContent.AppendLine(GetFlashVarsParameter(model, htmlHelper));
tagBuilder.InnerHtml = innerContent.ToString();
return MvcHtmlString.Create(tagBuilder.ToString(TagRenderMode.Normal));
}
private static string MovieParameter
{
get
{
if (_movieParameter == null)
{
var tagBuilder = new TagBuilder("param");
tagBuilder.MergeAttribute("name", "movie");
tagBuilder.MergeAttribute("value", "/ActiveReports.FlashViewer.swf");
_movieParameter = tagBuilder.ToString(TagRenderMode.SelfClosing);
}
return _movieParameter;
}
}
private static string _movieParameter;
private static string GetFlashVarsParameter(ReportViewModel reportViewModel, HtmlHelper htmlHelper)
{
var tagBuilder = new TagBuilder("param");
tagBuilder.MergeAttribute("name", "FlashVars");
string url = string.Format("URL={0}.rpx?OutputFormat=Rdf2", reportViewModel.ReportName);
foreach (string key in reportViewModel.ReportParameters.Keys)
{
url += string.Format("&{0}={1}", key, reportViewModel.ReportParameters[key]);
}
tagBuilder.MergeAttribute("value", url);
string ret = tagBuilder.ToString(TagRenderMode.SelfClosing);
return ret.Replace("&", "&");
}
}
}
先ほどの作成しておいたビュースクリプトファイル(Index.cshtml)にHelpersへのusingを追加し、FlashビューワのHTMLヘルパーであるFlashViewerForメソッドを記述すると、下記のようになります。
2011/06/13 修正
Html.RawでHTMLエンコードを回避していた部分を、ヘルパー側で行うように修正しました。
@model ActiveReportsMvcApp.Models.ReportViewModel
@{
ViewBag.Title = "Index";
}
<h2>Index</h2>
<p>
@Html.FlashViewerFor("reportViewer", Model, new { width = "100%", height = "600"})
</p>
つづいてActiveReportsのHTTPハンドラを有効にします。以下のアセンブリをプロジェクトの参照に追加します。
- ActiveReports.Document
- ActiveReports.Web
- ActiveReports6
Web.configファイルのsystem.webセクションに以下の3行を追記します。
<add verb="*" path="*.rpx" type="DataDynamics.ActiveReports.Web.Handlers.RpxHandler, ActiveReports.Web, Version=6.2.2659.1, Culture=neutral, PublicKeyToken=cc4967777c49a3ff"/>
</httpHandlers>
ライセンスファイル(licenses.licx)をPropertiesフォルダに追加し、ActiveReportsのライセンス情報を記述します。ライセンスファイルはアイテムテンプレートがないので、テキストファイルを選択してファイル名を「licenses.licx」として作成します。
DataDynamics.ActiveReports.Web.WebViewer, ActiveReports.Web
最後にプロジェクトのルートフォルダに、Flashビューワのswfファイルとそのリソースファイルの2つを追加します。
- ActiveReports.FlashViewer.swf
- ActiveReports.FlashViewer.Resources.swf
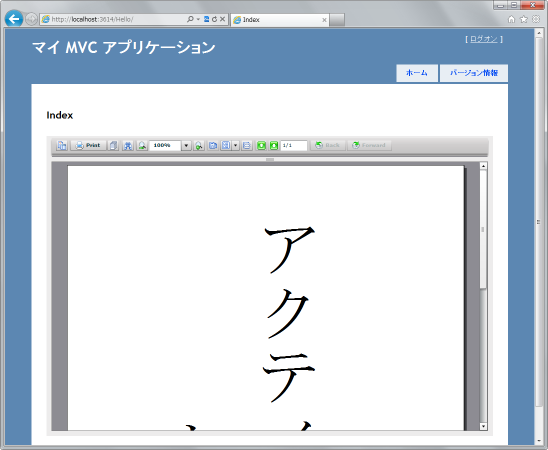
これで完成です。デバッグ実行でWebブラウザーを起動し、以下のようなアドレスを入力すればActiveReportsのFlashビューワに作成したレポートが表示されるはずです。
