WPF ToolkitのVisual State ManagerとBlend 2 SP1の隠し機能
CodePlexで公開されているWPF Toolkit - October 2008 Releaseには、以下の3つが含まれています。
このうちのVisualStateManager(以下、VSM)を今回は紹介したいと思います。VSMはSilverlight 2で導入されたおもにコントロールの状態(振る舞い)を管理するための仕組みで、ControlTemplate内ではWPFのTriggerの代役的な使われ方をしています。こちらの投稿で説明していますので、ご覧ください。
Blend 2 SP1ではSilverlight 2のプロジェクトの場合に限り、Stateという項目にてVSMを設定することができるようになっています。WPFのプロジェクトの場合、VSMがなかったわけですから当然BlendでもStateという項目はありませんでした。しかしながら、WPF ToolkitのVSMが有効な場合に限り、隠し機能としてStateの編集が用意されています。
Blend 2 SP1 + WPF Toolkit = Visual State Manager for WPF – Expression Blend and Design
以下にその方法を紹介します。
1.WPF Toolkitをインストールする。
2.Blendの隠し機能を有効にするために、以下のレジストリの値を1に設定する。
32 bit OS : HKLM/Software/Microsoft/Expression/Blend/EnableVSM
64 bit OS : HKLM/Software/Wow6432Node/Microsoft/Expression/Blend/EnableVSM
もしくは上記のページに登録エントリ (.reg) ファイルがあるのでそれを使用する。
3.Blendを起動し、WPFのプロジェクトを新規に作成する。
4.参照の追加で、以下の場所にある「WPFToolkit.dll」を追加し、一度保存したのちにBlendを再起動する。
C:\Program Files\WPF Toolkit\v3.5.31016.1
5.以下の内容をWindow1.xamlに記述する。
<Window
xmlns="http://schemas.microsoft.com/winfx/2006/xaml/presentation"
xmlns:x="http://schemas.microsoft.com/winfx/2006/xaml"
xmlns:Microsoft_Windows_Themes="clr-namespace:Microsoft.Windows.Themes;assembly=PresentationFramework.Aero"
x:Class="Window1"
x:Name="Window"
Title="Window1"
Width="200" Height="200">
<Grid x:Name="LayoutRoot">
<Button x:Name="button" Content="Button" Margin="50">
<Button.Template>
<ControlTemplate TargetType="{x:Type Button}">
<Microsoft_Windows_Themes:ButtonChrome x:Name="Chrome" SnapsToDevicePixels="true"
Background="{TemplateBinding Background}"
BorderBrush="{TemplateBinding BorderBrush}"
RenderDefaulted="{TemplateBinding IsDefaulted}"
RenderMouseOver="{TemplateBinding IsMouseOver}"
RenderPressed="{TemplateBinding IsPressed}">
<Microsoft_Windows_Themes:ButtonChrome.RenderTransform>
<ScaleTransform/>
</Microsoft_Windows_Themes:ButtonChrome.RenderTransform>
<VisualStateManager.VisualStateGroups>
<VisualStateGroup x:Name="CommonStates">
<VisualStateGroup.Transitions>
<VisualTransition GeneratedDuration="00:00:00.3000000" To="Pressed"/>
</VisualStateGroup.Transitions>
<VisualState x:Name="Pressed">
<Storyboard>
<DoubleAnimationUsingKeyFrames BeginTime="0" Duration="0" Storyboard.TargetName="Chrome"
Storyboard.TargetProperty="(UIElement.RenderTransform).(ScaleTransform.ScaleY)">
<SplineDoubleKeyFrame KeyTime="0" Value="1.5"/>
</DoubleAnimationUsingKeyFrames>
<DoubleAnimationUsingKeyFrames BeginTime="0" Duration="0" Storyboard.TargetName="Chrome"
Storyboard.TargetProperty="(UIElement.RenderTransform).(ScaleTransform.ScaleX)">
<SplineDoubleKeyFrame KeyTime="0" Value="1.5"/>
</DoubleAnimationUsingKeyFrames>
</Storyboard>
</VisualState>
</VisualStateGroup>
</VisualStateManager.VisualStateGroups>
<ContentPresenter HorizontalAlignment="{TemplateBinding HorizontalContentAlignment}"
Margin="{TemplateBinding Padding}" VerticalAlignment="{TemplateBinding VerticalContentAlignment}"
SnapsToDevicePixels="{TemplateBinding SnapsToDevicePixels}" RecognizesAccessKey="True"/>
</Microsoft_Windows_Themes:ButtonChrome>
</ControlTemplate>
</Button.Template>
</Button>
</Grid>
</Window>
6.以下の内容をWindows.xaml.vbに記述する。
Private Sub button_Click(ByVal sender As System.Object, ByVal e As System.Windows.RoutedEventArgs) Handles button.Click
VisualStateManager.GoToState(Me, "Pressed", True)
End Sub
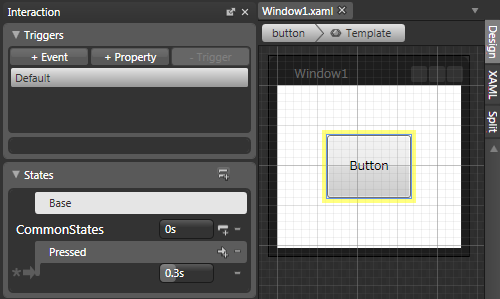
7.BlendでButtonコントロールのテンプレートの編集を行うと、下記の画面のようにStateの項目からVSMを設定することができるようなっているはずです。
